by
by 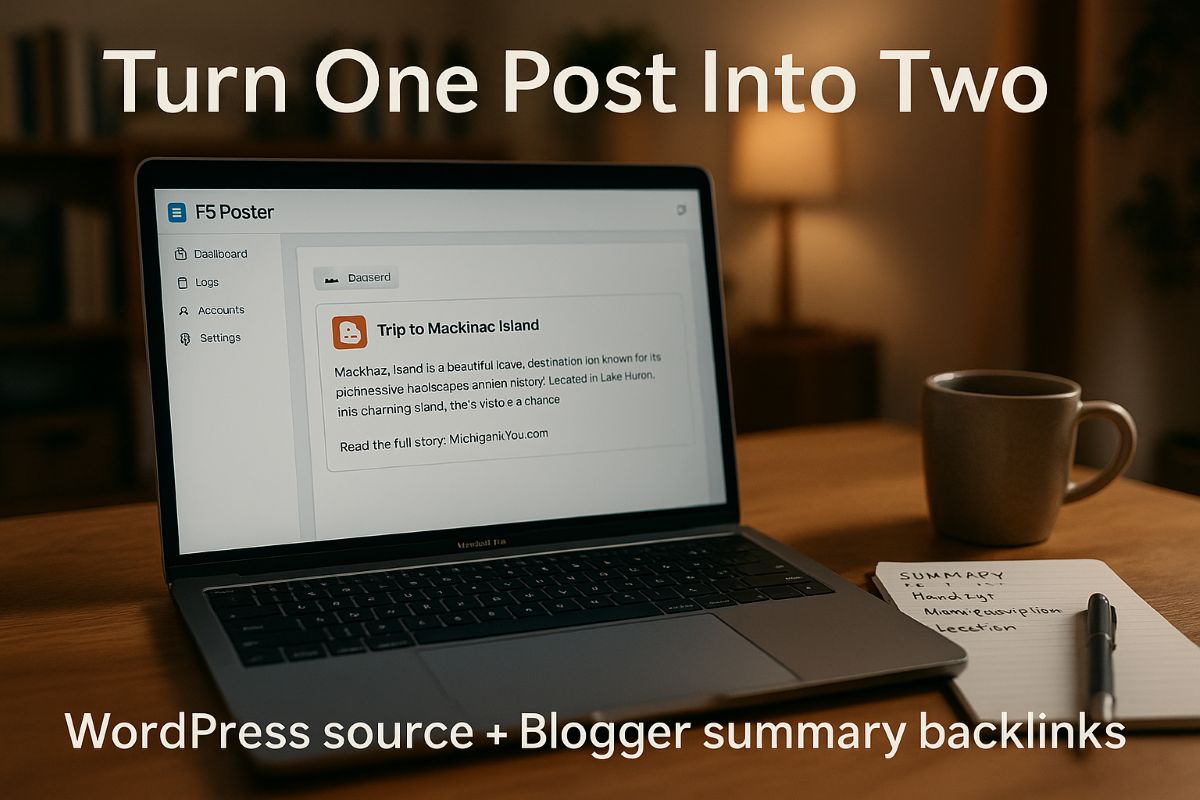
Small publishers often post the same story on multiple platforms. For example, it’s easy to set up a syndication channel on platforms like Flipboard. The problem is that near-duplicate pages can compete in search results, and the wrong version can appear first.
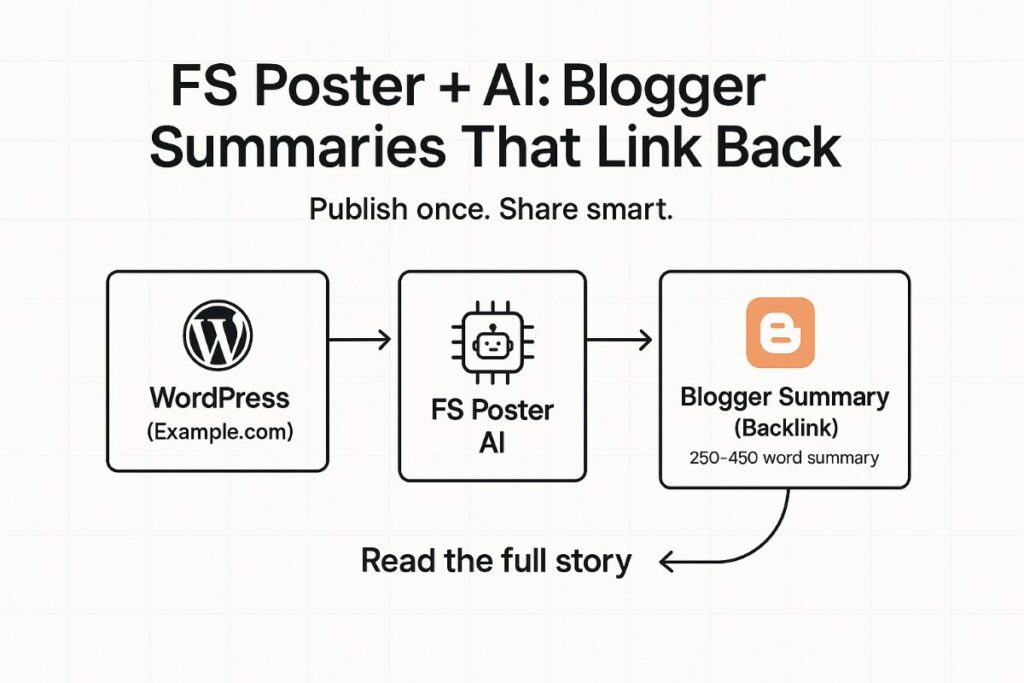
A cleaner approach is to publish the full story on WordPress and publish a short, clearly different summary on Blogger that links back to the original. That keeps your WordPress site as the source and turns Blogger into a referral and link channel.
This article is for someone who is experienced with using OpenAI and FS Poster.
This post shows two FS Poster AI methods you can run from the same WordPress article:
- a complete rewrite (optional, higher risk), and
- a summary post (recommended, lower risk).
WordPress to Blogger Why this works
- Lower duplicate-content risk: A 250–450 word summary is not a “copy,” so it is far less likely to compete with your original page.
- Clear “source” signal for readers: You link to the full story near the top and at the end.
- Repeatable workflow: FS Poster lets you reuse templates and keywords/tokens so you are not hand-formatting every time.
Prerequisites for FS Poster AI
- A WordPress site with FS Poster installed and your Blogger account connected. FS Poster has a specific Blogger setup and a per-channel “Customize content” option that can override default network formatting.
- OpenAI is enabled in FS Poster (FS Poster > Settings > AI settings), plus at least one AI template has been created in the plugin.
- You must have an account set up in OpenAI’s API platform. Create a new project, create a new Secret Key.
- In Blogger: “Search description” and “Location” are set in the post editor sidebar (manual fields). The AI can generate values for you to paste there.
The two AI methods
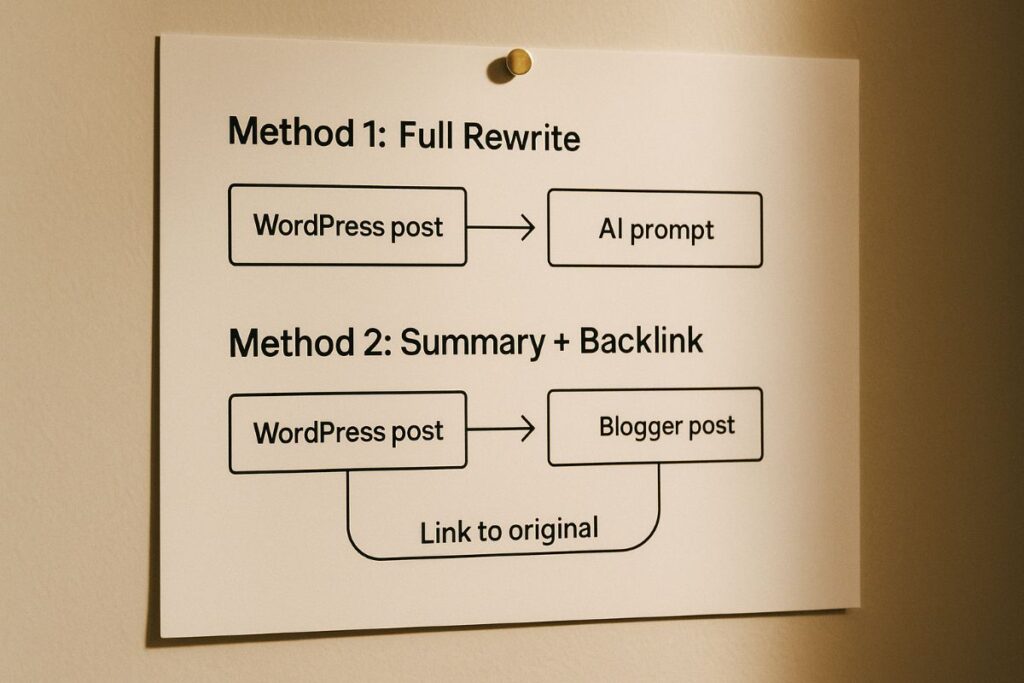
Method 1: Full rewrite for Blogger (optional)
Use this when you truly need a full post on Blogger for that audience. It can work, but it’s easier to end up with pages that feel “too similar,” which can split attention in search.
If you ever go this route, Google’s own publisher guidance for syndicated articles says canonical is not the preferred solution for duplication by partners, and it points instead to blocking indexing on the partner version.
That’s a lot of management for most small blogs, which is why the summary method is usually the better move.
Method 2: Summary + backlink post (recommended)
This is the “complementary post” model:
- Blogger gets the short version.
- WordPress keeps the full version.
- Links in the summary point back to the original.
The summary is different enough to stand on its own, but still acts like a front door to the full story.
Step-by-step setup in FS Poster
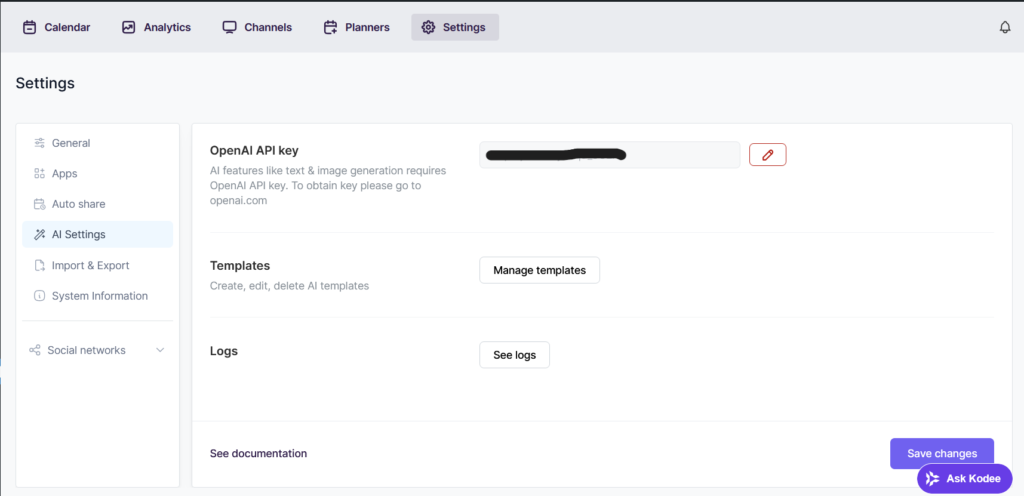
Step 1: Turn on AI in FS Poster
- In WordPress, go to FS Poster’s AI settings.
- Add your OpenAI key and save.
- Create at least one AI template you can reuse.
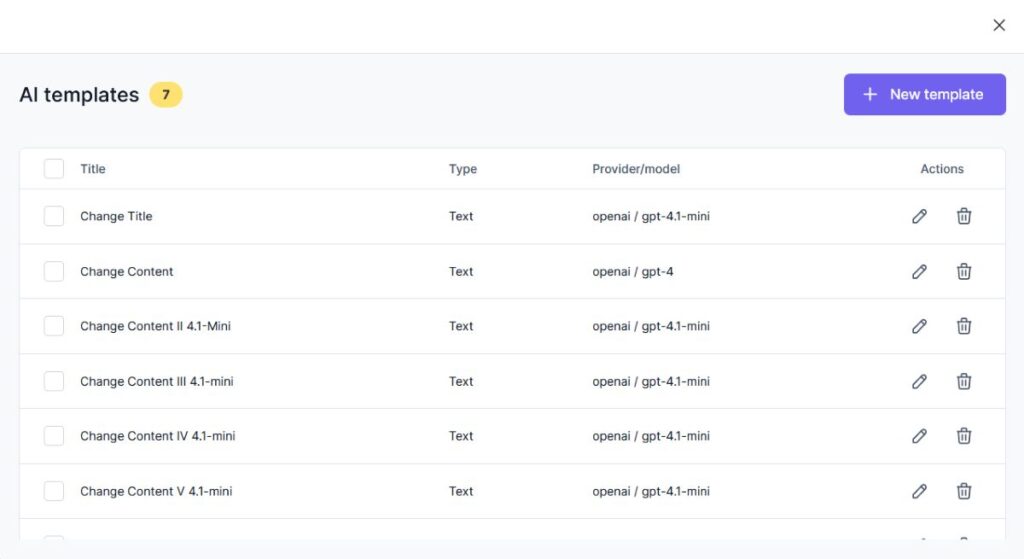
Step 2: Manage Templates
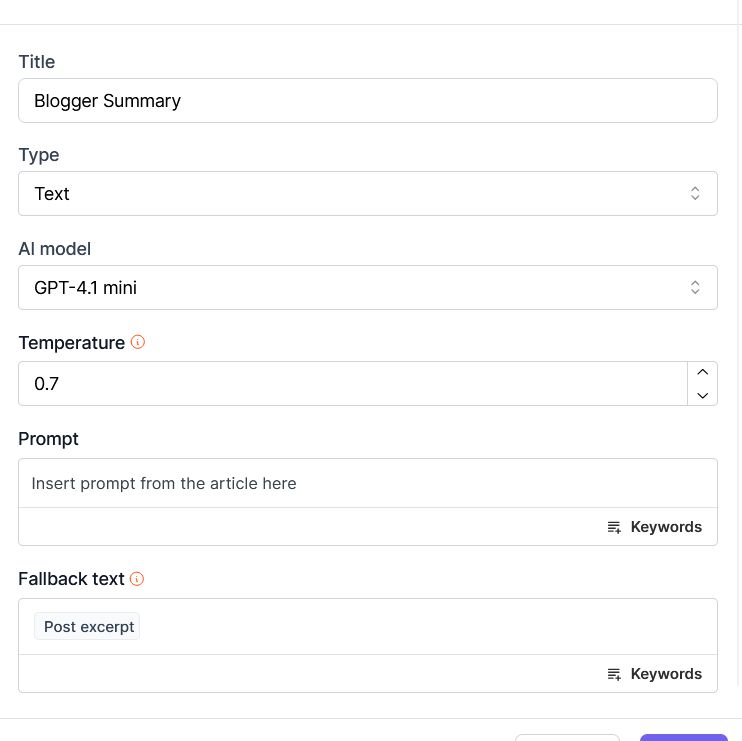
Click on the FS Poster to Manage Templates. Then create a new template that utilizes GPT-4.1-mini. Adjust the temperature between 0.5 and 0.8. In the prompt area, insert the prompt below. Click save.
Step 3: In FS Poster, create a Blogger “Summary content” Channel

In your Blogger channel settings inside FS Poster, enable “Customize content” for that channel so the Blogger output uses your AI template rather than the general network default. Note how we handle the featured image.
The ready-to-use FS Poster prompt for the Blogger summary method
Paste this into the FS Poster AI prompt box you are using for your new Blogger Summary post content as a new template. It outputs clean HTML, keeps spacing tight, generates a meta description and location for the Blogger sidebar, and ends with your required line.
You are rewriting and formatting a WordPress post for publication on Blogger as a SHORT SUMMARY that links back to the original.
INPUTS:
- Post title: {post_title}
- Original URL token for canonical link: {post_url options="{"type":"original"}"}
- Original post content: {post_content}
TASK:
Write a concise summary post for Blogger based ONLY on the provided post content. Keep it accurate. Do not add facts, quotes, dates, numbers, or claims not supported by the input.
PRIMARY GOAL:
This Blogger version must be clearly different from the original (to avoid duplicate-content problems) while sending readers to the full story on Example.com.
STYLE REQUIREMENTS:
- Grade 9 reading level.
- Conversational tone, plainspoken, specific.
- Avoid AI-sounding phrases and hype.
- Must avoid these cliché patterns (non-exhaustive): "unlock", "dive into", "fast-paced world", "game-changer", "not just", "whether you're", "in today's world", "journey", "ultimate", "must-see", "you won't believe".
- Also avoid: "testament" and similar grand framing.
- Use short paragraphs. Prefer subject-verb-object sentences.
OUTPUT RULES (HTML ONLY):
- Output HTML only. Do NOT use Markdown.
- Remove WordPress/Gutenberg wrapper comments like <!-- wp:... -->.
- Convert any plain-text URLs into clickable <a href="..."> links.
- Preserve existing links if they are relevant, but prefer linking to the original story URL.
- Preserve existing images found in the content:
- Keep <img> tags if they already exist in {post_content}, but do not add new images.
- If an image is missing alt text, add a short descriptive alt based on nearby text.
FORMATTING / SPACING CONTROL (critical):
- Do NOT insert extra blank lines between blocks.
- Do NOT use <br> for spacing. Only use <p>, <ul>, <figure>, <h2>, <h3>, <figcaption>.
- Remove all empty paragraphs and spacer lines, including:
<p></p>, <p> </p>, <p> </p>, <p><br></p>, and any paragraph that contains only whitespace.
- Never output (non-breaking spaces) as filler.
- Ensure there is exactly ONE block break between elements (no empty blocks).
- Apply these inline margin styles to EVERY block element you output:
- <p style="margin:0 0 10px 0; padding:0;">
- <h2 style="margin:16px 0 8px 0; padding:0;">
- <h3 style="margin:12px 0 6px 0; padding:0;">
- <ul style="margin:0 0 10px 18px; padding:0;">
- <li style="margin:0 0 4px 0; padding:0;">
- <figure style="margin:0 0 10px 0; padding:0;">
- <figcaption style="margin:4px 0 0 0; padding:0; font-size:0.95em;">
- Do NOT place <p> tags inside <li>. Each <li> must be plain text plus optional <strong> or <a>.
SIDEBAR FIELDS (must generate):
Before the visible post HTML, output ONE HTML comment containing:
- Location: pick the most specific place name present (City, Town, Park, County, or State). If multiple locations appear, pick the primary setting.
- Meta Description: 140–150 characters, plain text, no quotes, no emojis, no hashtags, no line breaks, no URL.
Format exactly like this (inside a single comment):
<!--
Location: <LOCATION>
Meta Description: <140-150 character description>
-->
STRUCTURE (summary format):
- Total length target: 250–450 words (hard limit 500).
- Start with a short lead (2–3 sentences) that states what the story is about.
- Immediately after the lead, include this line:
<p style="margin:0 0 10px 0; padding:0;"><strong>Read the full story:</strong> <a href='{post_url options="{"type":"original"}"}'>Example.com</a></p>
- Then include 2–4 short sections with headings:
- Use 2–4 <h2> headings that you create based on the main topic areas.
- Keep each section brief (1–2 short paragraphs or a short bullet list).
- Include one bullet list (3–6 bullets) summarizing key takeaways, tips, stops, or highlights when appropriate.
ENDING REQUIREMENT (must be last visible line):
<p style="margin:0; padding:0;">See more of this story at <a href='{post_url options="{"type":"original"}"}'>Example.com</a>.</p>
VALIDATION (DO THIS BEFORE YOU OUTPUT):
1) Rate the draft 1–10 for:
- Originality
- Truth-telling (staying inside the provided content)
2) Flag any phrases that sound generic or AI-written.
3) If either score is below 8, revise the draft and repeat validation (up to 2 rewrites) until both are 8+.
DEBUG MODE:
- After the ending requirement line, add a single HTML comment with the final scores and flagged phrases.
- Format exactly like this:
<!-- Validation: Originality=X/10; Truth-telling=Y/10; Flags: phrase1 | phrase2 | phrase3 -->
Return ONLY the final HTML.
How to use the Location + Meta Description it generates
- In Blogger, open the post editor for the draft post that FSPoster has placed. Note the sidebar.
- Paste the Location into the Location field. Blogger supports adding Location via Post Settings in the right sidebar.
- Paste the Meta Description into “Search description.” Blogger community guidance describes this as the post’s meta description.
- Review and edit the draft post for any spacing issues and publish.
Why does this help small personal bloggers
- It reduces the time required to publish on multiple platforms.
- It keeps your main site as the “single source of truth.”
- It turns Blogger into a steady stream of short posts that point back to the full story.
- It gives you a repeatable system: one WordPress post becomes one Blogger summary with consistent formatting and links.